Showing posts with label how to. Show all posts

Tuesday, December 11, 2007

Lighting for macro

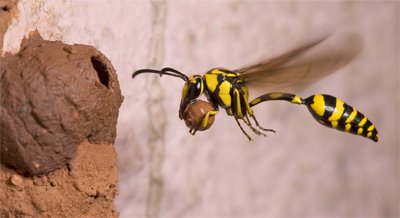
A paper wasp (Vespa sp) taking off from the nest
One of the things that I find annoying about macro work, mine mostly, work that has been done with flash is the bland, black, unlit backgrounds. These give you darn little feel for the environment the animal is in. They happen largely because all macro work is this fine compromise between magnification, depth of field (DOF), available light and flash light.

When you increase magnfication, DOF falls, it's the law. If you want high DOF, which you usually do, that means you've got to nuke the subject with light. When you're adding huge amounts of light using a flash and meter for the flash, it usually is over-powers ambient light. Its so much brighter than ambient light that ambient makes very little contribution to the final image. Hence the black backgrounds. (Strobist on balancing ambient light.)


A hornet leaves the nest to forage
There are off course many ways to deal with this. You can compromise on DOF, use selective focus instead of trying to keep everything in. That allows you to lower your aperture, pour in less light and be closer to the metering you would get from ambient light.

The second is simply to find areas of high ambient light. Not necessarily on your subject but on the background. On some distant object, for instance, which then becomes this nice bright source of buttery background bokeh as in the hornet images in the post. The bright patches in the background come from a tree which the evening light was hitting. It was at least 4 feet away from the nest, completely out of focus and created this lovely warm coloured bokeh. You can also use the sky in this manner, it's almost always a very bright source.

Inbound and outbound traffic

The third is to actually light the background yourself! I personally have gotten so stuck with the idea of lighting my subject that I never think of backgrounds at all. Off course, in my defense most of my earlier images used a single flash which could only be pointed in one direction. So, it was a bit hard to light two things at the same time, now with two I can do more if I want to.

The other good reason for lighting the background, is to be able to separate the subject from the background. When the main subject is lit directionally, it may have parts of it in shadow. This part will be the same near black shade as the background. It's a good idea not to have this so you can tell the shape and form of the subject itself, to separate it so to speak.

Two ways that immediately come to mind to do this, brighten the background as before or rim /back light the subject. The hornet pictures actually have both tricks in them. The back light is provided by a fully zoomed flash, you can even snoot it to prevent spill, the trick is to get the light behind the subject just lighting the edges.

A few more technical details on the hornets in my flickr photostream.

Wednesday, November 21, 2007

The hedgehog, the fox and every modern man's pox

Apologies to Stephen Jay Gould for snicking the title of his excellent book

This day was wonderful for so many reasons, can I have it back please?
Some of you know that I am a graduate student right? I work in the field of animal behaviour now, but my training has been much broader than that and I've studied and done work in several other unrelated fields in biology. I'm not a polymath, but I do have a passing familiarity with a fair bit of biology.

I sat to down to tea with a friend today at the mess and I found a paper lying next to the window. Here's the title of the paper 'A simple reference state makes a significant improvement in near-native selections from structurally refined docking decoys.'

Mallika Sarabai
I had a WTF moment, then V pointed out the name of the journal, it was 'Proteins'. We made a game of it and tried to piece together what the paper might be about, based just on the title. The best we could make of it was a very very hazy idea. To think I've even worked in computational protein biology, albeit a long time ago. Worlds move on, jargon grows, knowledge becomes extremely specialized and inaccessible even to people just outside your sub-specialty. In Frazer's view the evolution of human societies went from magic to religion to science and it seems sometimes to have come full circle again and back to magic. Much of todays science is so technical and narrow that its much beyond the reach of so many, it might as well be magic.

Throwball player
What does this have to do with photography? A bit, I will come to it soon, I promise. Before that let me tell you about the hedgehog and the fox. Many of you might have heard of the adage, "The fox knows many things, but the hedgehog knows one big thing". When hunted, foxes apparently try many different tactics to get away from their pursuers. All hedgehogs everywhere, off course, do one single thing, they curl up into a spiny inaccessible ball.

Isaiah Berlin and then others have used the fox and hedgehog analogy to divide writers, scientists, thinkers, etc into these two categories. Those who are fox-like and have multiple approaches, or do many different kinds of things, in whose life multiplicity is key. And those who are hedgehog-like, who dig deep into a single thing or idea and thoroughly study its every aspect. You're either a hedgehog, singular and focused; or a fox, multiple and hence, by implication, superficial. Depth or variety, those seem to be the choices offered.

Here is the modern man's pox. That it has come to this, a choice.

If you want to make the top of the game, given the way it's set up, usually the foxy choice is hard to make. In any field. To reach the top of the game, I might add, not your game. It's also true of photography. Nearly everyone at the very top of the field has a sub-specialisation, they inhabit a very special niche. Portrait photographers, children's portrait photographers, wedding photographers, bird photographers, industrial photographers, foundry parts photographer, automotive parts photographer what have you. Sometimes its not even a reaching the top affair, its a survival affair. I have occasionally felt the desire to go pro. The narrowness sits uneasily with me however. I can't see too many ways around it however.

When I think about where I come to photography from, something in me rebels against this. I am, as it stands, a scientist. I have a little creative instinct somewhere in me, it likes to express itself this way. I have things other than science that I enjoy, that I am passionate about. The reason I shoot is to make myself multiple, multi-dimensional.

The truth be told I am a pretty narrow photographer already. Look at my portfolio. I'm a nature photographer, in fact there are some who think of me as a macro photographer (how I squirm). Thats my hedgehog nature. And its what makes me good (sometimes, even if I say it myself). Nonetheless, every time I find myself stuck, hitting plateaus, in the way I see or shoot, I do one of the following two things. I pack my bag with a single wide lens; a wide right now, because that is what I shoot least. Or I shoot people, something I've always been uneasy with.

Looking at people looking at the image not the thing
Shooting people teaches me a lot about the theater within an image. Shooting wide teaches me a lot about the construction and configuration of elements within images. Both of these types of shooting are unforgiving in their own way, images fail easily. To make them well, I must learn certain basic things, about patience, form, position, timing, etc; these I can apply everywhere. I find growth in any direction, even away from my primary direction, is very satisfying. There's a part of me that knows it will pay off eventually. Every foxy thing I do, I can bring to bear on my hedgehog concerns. I think the Wiki version of the hedgehog and the fox idea codes it a bit wrongly. It's not so much to see the world through a single lens, but to make many lenses bear on the same world.

Monday, November 12, 2007

Returning

Mushroom cluster 8th Nov (no 2 in linked post)
Just because you got a good picture of something does not mean it's over. That the thing is done, wrap up your cameras and close the door behind you. There is almost always more to come. Learn to have patience, learn the rewards of return.

Things, particularly living things change, they evolve, they like people display sides of themselves that you've never seen before. You cannot anticipate everything, don't try to. Even the inanimate things, light moves over a familiar surface, moss climbs over it in the rain. Everything changes and you can keep looking and keep learning. Try not to be so wrapped up in shooting that you forget to see.


The same cluster 10th Nov

Many people visit the same places and yet their photographs are not the same. What sets the good apart from the also-rans is the ability to see and break tired ways of seeing, the patience with a subject that cracks it wide open. The good shot you wanted and got in the bag is often the one that has more to do with you and your head than with the subject at hand. Sometimes you need to stare at something stupidly for a while before it begins to speak to you. (It helps an awful lot if its an immobile thing.) Don't be easily satisfied.

More from 10th Nov

Monday, July 02, 2007

Wildlife photo secrets(5): Which one's are the keepers?

Red weaver ants eat a dead Giant African land snail
Disclaimer: This is going to be my most ambitious post ever. Please disagree with me and tell me how you do it, we will all be the richer for it.
Can't get no satisfaction

So you know how to take photographs? You know about aperture and you know about shutter speed, and you got exposure down pat and you can even light up things perfectly. You got the best gear, your money can buy. You can take pleasant, well lit, aesthetic pictures. But you still can't get no...satisfaction.
You look at your shots and they seem an incoherent mess. Then you look at someone else's, and they seem so... together and each of their shots seem so ...good! What's going on?

Everyone, at least every human hits this plateau. You learn like crazy in the beginning and the curve is steep and then it peters out. You plateau out, and then flounder because you don't know which way is up. You look at shots that once made you the proudest photographer in the world and they aren't enough anymore. How do you get better? As Mike Johnston put it, that is the crucial sentence. You need to want this first, everything else follows. If you don't ask it you're a non-starter.

Recently hatched spiders parachute off their natal leaf
What does this have to do with keepers, or basically good photo-editing? Everything. Get this, shooting great pictures is only the first step. Knowing the good ones from the bad is the second. To become a better photographer, you must know good photography.


Step 1: Intention
Here comes the contentious part. What is good photography? The way I see it, is it all comes down to, what is the intention
behind the photography, whether it is a useful / interesting / whathaveyou intention, and whether it is achieved. The second and the third as you can obviously see are extremely subjective. Whether something is worth it or not and whether it achieve what you want is debatable. Having an intention at all is not subjective...(or is it? Humans are known to make up post hoc for why they did something even when they could not have had any reason to do so.)

So then one of the first steps is to have an intention, an intended goal, preferably before you shoot. Less desirable would be to generate it for a certain specific project when editing through your archive for it. What is the story / narrative / emotion / feeling / thought that you want your photograph(s) to convey? What is it's purpose? Why is it in your keep section? Many people fail right at this step. They don't have one.

A Zitting cisticola zits

To me all the other things, light, aesthetics, composition, colour, sharpness, bokeh, everything is eventually subservient to this goal. If they don't serve it, they detract. Never make these your ends, you'll will have beautiful, sharp, etc photographs not good ones. Because good asks good for what?


Step 2: Is it worth it?
Off course, cueing from the previous section, cleverly you are going to ask for whom? Here is where your audience comes in.
Who is this image intended for and are they/he/she/it going to think it's worth it. It's subjective, but it's better focused. There are no rules for who the audience is (it can even be just you). But once you have picked one, you've got to play by their rules. Or know them, at least, and break them effectively and to some effect.

You cannot (usually) show an orthodox family audience something like Mapplethorpe's revolutionary presentation of human sexuality and expect them to be pleased about being shaken from their conventions . And you can't show art critics your family shots and expect kudos for originality. There are certain situations (and intentions) in which these statements break down, but presumably you get the drift. Worth it, is worth it for whom?

Step 3: Is it good enough?
Can I do better at telling this story? Is there actually a better story to tell that I have learnt about as I made the images for this story? Does this image effectively pull up the response that I want from my intended audience? If not how can I better it? What would be more effective? In a word, iteration.

A bat pollinated bloom of the African sausage tree

And the willingness to drop the not so good ones. Remember your first may be but usually won't be, your best. As I've said before, there is no simpler non-secret to getting better shots than to keep trying. Judge as objectively as you can, when that begins to fail you, find a sounding board use it. Look at other pictures, learn to discriminate between/judge them. Learn what makes one bird / landscape / insect / whathaveyou photograph better than another, for a goal and an audience. then apply what you learn there to your own. Start over.
And that's how I hope to get better...How do you do it?

Others in this series: Wildlife secrets parts 1, 2, 3 and 4.

Monday, May 21, 2007

Wildlife photo secrets(4): the canopy

Small green barbet
Everyone who popped in and said hi on the previous post, thanks. And here's the next 'how-to' promised.

It's very seductive to think of grandiose names for the unknown. The canopy has been called, in scientific literature, the final frontier. Like the deep oceans and space, who also lay claim on that moniker, it's relatively unexplored and the first few forays into it have yielded a lot that is new. The oldest method of trying to get at animals in the canopy was fogging, immensely destructive and unjustifiable (not to mention useless) if you wanted to photograph living animals.

Pariah or Black kite

Then came the more (ahem!) sophisticated methods, the canopy cranes, bridges, rafts, hides and ropes. But do what we might, the human monkey has lost his ancestral ease among branches. All these tools take us up a bit and down again with little lateral leeway. And most of all they are available to very few people, usually researchers and then for a very little time.

So here's the good part, I've found that for urban/semi-urban wildlife photographers there are canopy cranes aplenty. They are called buildings. Many many rooftops, balconies, windows are actually very close to trees, the canopy within touching distance. These can be absolutely great to watch and photograph what usually goes on above eye level.

Blue rock pigeon

Look out for places where trees are close to a opening and then look out in them for animal activity. Whether it's nesting or nest building birds or birds and other animals that come in to feed when the tree fruits or flowers, or even birds that come in to roost or perch. Keep an eye out for anything you can convert into a photographic opportunity. The great thing about this little window of access is the ability to peer from a ready-made hide (the building) into a usually secret world. And off course, eye-level shots that are so much more attractive than those belly shots from below.

Rose ringed parakeet
But that's so much for the larger birds and mammals, what about the insects? The truth is most of those canopy access techniques I spoke about were actually devised in order to reach the smaller creatures, the arthropods. These cannot be shot merely by looking out over a closeby branch. The long lenses don't get you quite that kind of magnification and you can't really get much closer to the animals.


Long horned beetle
There is however a sort of indirect way that you can get at these animals. The photograph of the long horned beetle was got by this technique. In all of my time of hunting in the undergrowth I've never come across one of these wood-boring beetles. Yet they are all over my bathroom.


Praying mantis

The basic story is this, the lights in our bogs are left on overnight and they attract plenty of insects. (You can increase the efficacy of capture by using insect attracting UV lights). I live a floor off the ground and the canopy is close to our windows, sometimes peering in. The insects that are attracted to the lights here are often from the upper canopy and not the usual ground and undergrowth dwellers. All I do is go look everyday for something interesting. You'd be amazed at what you can get. The moths in the Nat Geo story were entirely from an urban backyard. (That story began in the bogs as well.)

Praying mantis
I keep a few vials and containers handy with me, catch what is interesting and take it to a habitat similar to what it must have come from and then shoot it. The insect goes free, I get some shots. It's pretty much win-win. Off course you're not going to get any big behavior shots this way. But you do get some spectacular animals and portraits are usually tractable with a little knowledge of insect behavior and some gentle coaxing. The insects in this post are all bog-insects!

So go try out your very own canopy access system!

Others in this series: Wildlife secrets parts 1, 2 and 3.

Tuesday, May 08, 2007

Wildlife photo secrets(3): Getting close

Red wattled lapwing through grass
"If your pictures aren't good enough, you're not close enough." -Robert Capa. (Link to another site about Capa)Robert Capa, co-founder of Magnum, whose autobiography Slightly out of focus I recently read spent the best part of WWII getting close to the action. Its a hilarious read; he had to go through a lot to just stay in the war theatre with no passport and no press agency backing. He managed this feat of staying on in the war theater and close to the action with some amount of trepidation, at much risk to himself. He gained access mostly with a smile and with the lubrication on which he claims all armies move, alcohol (a strategy I haven't tried yet!)
Wildlife is both similar and different. Unlike people in wars, intent on their own purposes, wildlife notices your presence and reacts to it, usually by bolting. It's similar in that in some ways and sometimes it can be dangerous; for example with large carnivores, venomous snakes, etc. To get close, knowledge about your subject, its habits and capabilities, is paramount. I'll try and tell you what I have learnt. I'm still not as good as I would like and your own suggestions are very welcome.
Saw-scaled viper

Motion
Most wildlife: birds, insects, snakes, mammals, will react very quickly to motion. What this means is if you make sudden quick jerky
movements, you will be noticed and whatever you are shooting will run away. So learn to move slowly, smoothly. I have found this can require quite a bit of strength and agility, so develop those. And oodles of patience, the hardest muscle to build.

Even if you have been discovered, staying motionless afterwards makes animals forget about you and continue with their life after sometime.
Clothing
Camouflage clothing is artform, no really, look at what the military has been upto with it. It's useful, certainly you can't be wearing bright white or red clothes and expect to go unnoticed. Dress appropriately to the environment you expect to be in. Quiet shoes, comfortable shoes, discreet colours. If you can camo your equipment as well.
Silence
This is actually one of the reasons I dislike shooting with other people. Silence obviously keeps attention away from you, but it does a second thing. If you are quiet you'll hear other things, you'll find subjects to photograph or you'll notice that elephant sneaking up behind you. So leave the Ipod behind ok? Shootings safer and more productive that way.
Don't smell
No really. Particularly with mammals, strong odours, deodorant/perfume is a guaranteed way of not getting any shots. Leave your vanity behind.


Mongoose cub eating temple offerings
Sit still
The classic wildlife mode of shooting off course is to stay in one place and let animals come to you, hide photography. Get a hide, a camo net and stay. Hedge your chances of getting close to something by setting up a hide near a resource an animal needs (water, food, salt lick, mating grounds) or a place an animal inhabits (nest, den, etc). As I said knowledge is everything. Also oodles of patience, and all of the above. Some people also use bait, I haven't yet, although I have sort of used food others have set out.
StalkingThis is a different kind of photography altogether. All but sit still applies, well actually sit still, move, sit still, move, you get the idea? Use the terrain, hide behind things, plants, stones, etc. Stay out of direct line of eyesight of your quarry. Use zig-zag or round about approaches to it. When there isn't anything to hide behind squat on the ground and move bent down.

Keep your camera close to shoulder high while approaching. Its hard to do this undetected when you're close. (Any other ideas here?)

Remember your limits, never get too close, you'll loose your shot or worse get bitten, gored or killed.
When in doubt err on the side of caution.Familiarize
Believe it or not animals do get used to you. Wear the same or very similar clothes. Be unobtrusive and completely non-threatening. Keep returning to the place that your quarry is, it will maybe eventually accept you as part of the landscape. True of birds and mammals, insects and reptile, probably not.

Finally,
f5.6 and don't be there!
Camera traps are cool, and potentially expensive. So using remotes is also an option, stay close enough so you can trigger and guard your gear.

PS: the first 2 images link to my new Flickr gallery, following Strobist ideas on the service. Will see how it pans out.

Monday, April 30, 2007

Wildlife photo secrets (2): learn about light

The previous post generated quite a response so I'll keep going; for a while anyway.

Actually any kind of photographer, not just a wildlife photographer needs to learn about light. It's right there in the name, learn to write (graphy) with light (photo).

It's the seduction of animals, birds, butterflies, flowers (pick your poison), that brings many people into taking pictures. Most people are just happy to have records of what they saw. A few will attempt to see rarer and rarer things in order to photograph them. A few will try and catch a rare behavior. This is eventually the point of the the whole exercise to many.

But, this will not always make a good photograph and certainly not a good photographer. What makes the latter is a certain ineffable something. However, the first has quite definable elements. One of them is light!

Saying that light makes a photograph is trivial, except what I mean is it makes or breaks a good one. Good light can elevate the mundane to beauty and bad can do the reverse.

So what's to light? Well, there's different kinds of lights. Heres all the features in which light can vary and that you get to play with in a photograph.

(a) brightness (the obvious one). You can have a high key image in which you pour a lot of light onto both the background and/or the foreground. Or you can go with the darker more mysterious look that allows just a subtle limning of the solid form of the object being photographed. Picks up a little detail no more, unlike a silhouette (which you can also do.)


(b) spectrum: there are warm lights like the light you get just around sunrise and sunset are often make very winning photographs. Or cool light, which you usually get after the sun's gone down, on overcast days or in the shade, can make mysterious looking images.
The kind of colour you get will depend on the WB if you're using digital. So if you want to keep these casts (loosing which can be quite silly) the easiest thing I've found is to leave things on daylight WB.


(c) Hard light, where shadows have sharp defined edges. Most photographers seem not to like this light, it can nonetheless be turned to you advantage. At least partially because in this light, colours are often quite saturated.
Diffuse light, with softer or no shadows at all, the love of all photographers, particularly macro people. The light that seems to come from everywhere at once.


(d) The area that the light hits, how tight the beam/spot of light is and what kind of fall-off it has on the edges. Like the tighter, harder edged spot of light on the owl versus the softer edged halo around the saw-scaled vipers head. The idea here is to draw quick attention to the specific object of interest while keeping it away from that not of interest.


(e) The direction the light comes from:top-lit, back-lit, vs front-lit vs side-lit. The backlit and hence rim-lit tree cricket versus the front left lit ant.
Again, its a way of emphasizing one element as opposed to the some other element in the picture. (Note that the ant image also has pretty controlled fall off, avoiding lighting any other leaves or elements of the background that might prove disturbing.)


(f) and finally something I have no clear examples for, number of light sources and the intensities and 'cast' or 'colour temperature' of each source.

Now what you've to figure out, when working with available light, is what kind of light you're working with and how to use it to your advantage. If you're making you're own light, decide what is the kind of light that would be best for the situation. (I know it's hard, but this is just the start!). If you want to know more about light, and even more about lighting something up using your own light sources, try Strobist. I've learnt and continue learning a helluva lot there.

And if you're still with me at the end, wish you good light!

Friday, April 27, 2007

Widlife photo secrets: time and access


In my callow photographic youth, in 2004, I met another photographer. He cast a pearl before me, he told me half the battle in getting good wildlife photographs is access. I didn't think much of it then, but three years behind me, I know precisely what he meant.

There is no simpler non-secret to getting better shots than to keep trying. To keep your eyes and ears open all the time and keep iterating until you get what you want. You've got to know whats worth getting and whats worth keeping, and then you're set, all you've got to do is push push push.

The best stories are worked over many many (oh don't be shocked now) years! Yes, years! There are good one's that are shorter, but the truly blue chip take years. Lanting's Jungles, Salagado's Workers, Nick Nichol's work in Bandhavgarh, etc.

The luxury of that kind of time is very hard for most people to come by. Many wildlife photographers, filmakers will given a chance lament the quick turn-arounds that are required of them. It was one of the reasons the Planet Earth series was hailed as a breath of fresh air. It was a production the size and length of which hasn't happened in a looong while.

Even if you had the time, you may not have that other golden thing, access. In India in particular, few natural habitats remain and these have gatekeepers, forest departments. Just getting in can take a lifetime. Then when you are in, you're often allowed to do very little, no setting up hides, no water hole waits, no walking in some parks(!), no camera traps. Then there is the expense associated with living and travelling in the park. Our labs field station budget is of the order of thousands a month! And just to break the camel's back, there are huge fees associated with shooting/filming in parks, especially filming.

So, to cut a long story short, work on the access bit. Or work the bits that are accessible. Learn to mine the places that you can go easily and then work them to ...um ...death. Hey, it's worked for me!

Seriously though, one of the huge advantages of undertaking the kind of project I have is that I have access 24/7 to most places. And I can get in to most other places with a little wheedling and cajoling. This is probably one of the few areas where being a woman makes things a mite easier, people percieve you as less of a potential threat. But even if you're a guy, it's not such a difficult skill, most people will let you in once, twice. The third and fourth time eyebrows rise and maybe you're turned back. But, persistence pays, and public spaces are still just that. You just have to bone up on your smile a bit. And as the big guy at NHM said, it's not how rare, exotic or unfamiliar your subject is, its about how good your photography is...Unfortunately we're all still stuck figuring out why or when something is 'good'.

Friday, November 24, 2006

More star streaks

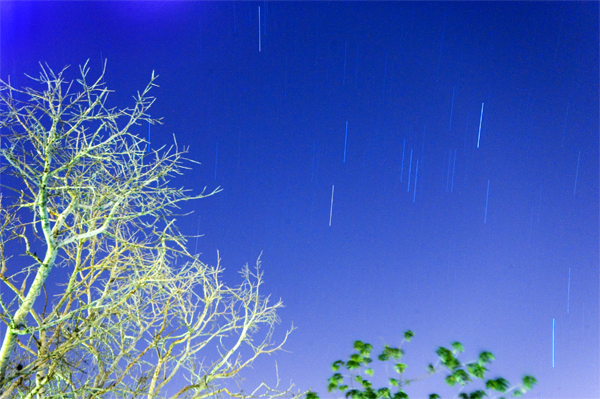
Orion travels over Bangalore's nighttime sky. The amount of light in the sky over the city is much higher than that over Hampi and the sky shows up as a hazy dirty orange rather than black. You can see the haze at the bottom of the window that's more haze from IISc street lamps, building lights and such like. If you set the WB on your image to tungsten light it sets back to this nice blue, so I'm guessing most of the stray light has this temperature.

I took this at f10 (and the light still shows up!) for about 20 minutes at 200 ISO. Pointed it high up in the sky to avoid as much background light as possible. I also sat so my shadow fell on the camera cutting off some ambient light as well. I also shut off the long exposure noise reduction option on my camera which meant the camera didn't lock up for a long time after a shot. There is some noise, you can deal with most of it using some noise reduction software.

Only thing being I wish I would think to do these things in summer. It was freezing up on the roof. Not too many people really go up on the hostel roof and a girl saw me climbing up and apparently called and asked who I was. I predictably didn't hear her and carried on. A while later there were two girls standing on a ledge facing the roof looking up. I thought they were out looking at stars or something so I carried on setting up my shots. After a bit there were 3 and I figured they were looking at me and wondering what the f*** I was upto and who I was. I must've looked nice and suspicious in my black turtle neck! I asked them if something was the matter and I think they either figured out who I was or at least realized I was also a girl, because the relief was obvious in their laughter!

Sunday, May 14, 2006

Open wide

I need a go ahead for a project and until that happens I'm slacking a little on shooting. Well that and its hot, and I am killing myself learning how to swim well....Summers lovely.

Quick post about why a good wide is a MUST for a wildlife photographer

Animals live in some kind of environment and sometimes you want to depict that relationship in an image. Often however the problem is that the elements of the that environment, in which the animals is situated are much larger than the animal itself.

And any image that has both in the same shot if its made with a conventional mid-range to long tele is going the compress the tiny animal against a grand huge background. this your standard too tiny in the frame animal. mind you, that you can choose to show only some part of that environment and let the rest suggest itself as 'more of the same'. Here's an example.

Fairly informative. Pond herons roost on dead trees. But it will by its very nature leave out something. for instance that this particular dead tree is next to a pond. If you try and include the pond in the pict by zooming out. well the heron become smaller....and the pond becomes the picture....

So if you want a landscape feel to your image, want to give a feel of the WHOLE area, and yet want to have your animals at a size thats noticable, try a wide.

Whats a wide allows you to do, is create a perspective that the human eye does not normally have. It makes objects closer to it much larger than those further away.

(link to get you to understand this.)

so now if you can manage to get close to your animal and have all your landscape elements neatly organised behind the animal, voila animal elements all similar sizes managing equal amounts of attention.....

easier said than done, lets see you get a couple of inches from this mongooses nose!

Friday, April 07, 2006

Sometimes its just about being awake

And then off course once you've seen the opportunity, about taking it. I'm sure you've seen these pots in you're home. well i realised there was a just begun one in mine and i figured that well the wasp will come back and finish it. so i waited for it. the first set of pictures were ok...not close enough, light wasnt right. but because i knew what the wasp would do i could set it up so things would be right...

Then i waited over several days, hoping to catch a trip when she was bringing some mud in...and now i'll wait for until she brings over some caterpillars.
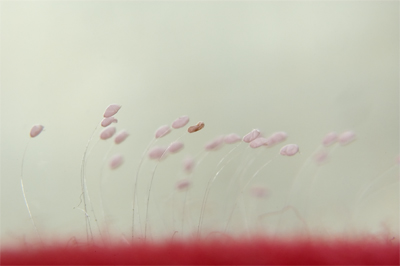
Other times its even easier than that. these are lacewing eggs, they've hatched unfortunately. next time i hope to catch them before that happens. These were on my balcony curtains, the red lights them up nicely, doesnt it?

oh the other story in this one? make sure you've backed up before you delete!!!! i deleted all the RAWs for this session and theres no back up, oh well, they're still there i'll try and redo it .

The addendum to this story is that I was never really able to 'redo' it to my satisfaction. The positions of the eggs had been altered due to many things...and I couldnt replicate what I wanted to. Moral of the story, do not loose your RAW files.

Thursday, February 09, 2006

What's luck got to do with it?

Something, a little bit ...I waited nearly 3 hours for these pictures. I've waited 2 years to wait those 3 hrs!

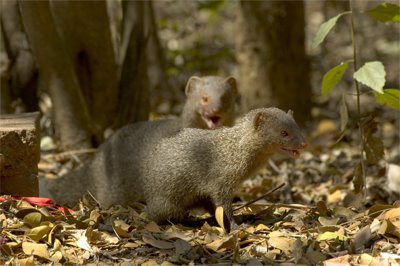
I walked down a mud path on campus a few days back, looking for owls. I didnt find any. The lucky bit was that a family of three mongooses were there instead. They probably visit this bounty of bananas left behind by a devotee next to a small roadside shrine once in a day. I happened to walk by at the time that they made their daily visit and saw them before they disappeared into the brush. That was lucky....I know now they are there maybe, 20-30 mins cumulative in a day.

I didnt get any shots on that first day. I've gone back to that place 4-5 times now. This thursday, I had a day off and spent nearly three hours waiting for them to turn up. And they did.

Originally posted: Feb 09 2006

Friday, November 25, 2005

Change and stasis

Few of my images betray that I shoot in a place that where humans are close by. Few pictures betray that almost all environments in my pictures are modified, however subtly, by human hands. Which is a significant omission, IISc is an urban campus. There are many people here, many buildings and much activity.

Many habitats are closely watched and controlled, grasses cut to prevent fire, paths cleared, bush cleared to protect power lines, telephone lines, buildings, etc from damage. Occasionally unnecessary things get done too, because someone making a decision thinks its an improvement. Exotics are planted, human garbage encourages some species, discourages others...and so on. People sometimes mean well, other times not. The bottom line is they alter...they change. And the animals I shoot respond to these changes.

* a little digression* i owe a guy called Sohrab Hura a bit of a debt here...many of these issues he started me thinking on.

How do you apply something thats essentially a static medium, ie photography, to document this change? (Open to ideas here)

What is the nature of change? Theres the cyclical changes of the day, the seasonal year, the cycles of rain that come and go. When do you know that a change is because of x and not because of y. Off course thats what huge areas in ecology deal in, theres tons of statistical tools like mds, pca, etc help you test these things. So in some ways thats a stupid question. And communities in relatively undisturbed forests are very dynamic and change all the time....

Its tempting to conclude that much of what I see is just that change that is part of the natural process. Yet I'm not always so sure. It's the pace in some instances that is alarming. In others that you see habitat shrink, sometimes disappear. I see the numbers of dogs go up, I see ground nesters disappear...you seem to see cause and effect in operation...its tempting and very hard to ignore. and yet theres a little guy back there that keeps screaming 'alarmist'!!!

well anyway thats a digression...human intervention is possible to depict, the hand of man has many classical and accepted visual idioms. barbed wire in one case; garbage as in the UNEP winners pictures, road kill, etc.... change however is harder to come by...

I suppose the classic ghost in the frame effect... sometimes done with multiple exposures...other times with very low light and loooong exposure. Nichols again does a lot of this...but then he revels in low light conditions. yet that sort of change is within the now, within the frame... how do you encapsulate hours, days weeks, months, years in images?

Monet did his famous haystacks in the different seasons to show the passage of time. Ansel adams drew on that tradition when he made his famous tide images. A series, usually a triptych...*the trinity is such a christian thing, well actually, no, even we have our three guys, yeah? brahma, vishnu & maheshwara?* the success of adams approach is in that he maintains the same angle and of view and the eye immediately starts picking over the scene to spot the differences. its like frames in a video shot.

Monet of course, uses many views and angles, i find myself reconstructing the place around the haystack, theres a sense of physical space that grows out of it. good impressionist that he is he also creates an atmosphere of winter/summer...the mist and fog of winter and the harsh hazy light of summer...theres also the sense of change from the fact that many are painted at sunsrise/sunset. then theres the idea of painting haystacks, essentially things that will get used eventually, will diminish eventually as landscape. painting the mutable in the style conventionally used for something immutable, mountains, rocks...stone.

There are, of course, those that believe that transience is the one thread, one commonality that hold all photography together. The decisive moment is this isnt it...this moment caught in midflight...hold still matrix style look around, it will never happen again, never like this...(i havent read the book i confess, this entirely second hand, i dont know if this is what bresson meant at all).